Getting started (JVM)
Welcome to Gobley! Gobley is a set of libraries and tools that help you mix Rust and Kotlin, so you can focus on implementing your business logic. In this tutorial, you will learn how to embed Rust code into your Kotlin/JVM project using Gobley. If you have trouble setting up your project, please create a question in GitHub Discussions.
Prerequisites
To develop an Kotlin/JVM program, you need to install IntelliJ IDEA. Using Android Studio is also available for Kotlin development.
To develop in Rust, you need:
- A Rust toolchain.
- An IDE for Rust. Several options are available:
- Visual Studio Code with
rust-analyzer. - RustRover.
- IntelliJ IDEA Ultimate with the Rust plugin.
- Other editors like Vim. Still, using
rust-analyzeris recommended.
- Visual Studio Code with
Creating a Kotlin/JVM project
Let's first create a new Kotlin/JVM project.
- Open IntelliJ IDEA.
- Select File > New > New Project.
- Select Kotlin.
- Rename the project to
MyFirstGobleyProject. - Select Gradle as the build system.
- Select Kotlin as the Gradle DSL.
- Change the GroupId to
dev.gobley.myfirstproject.
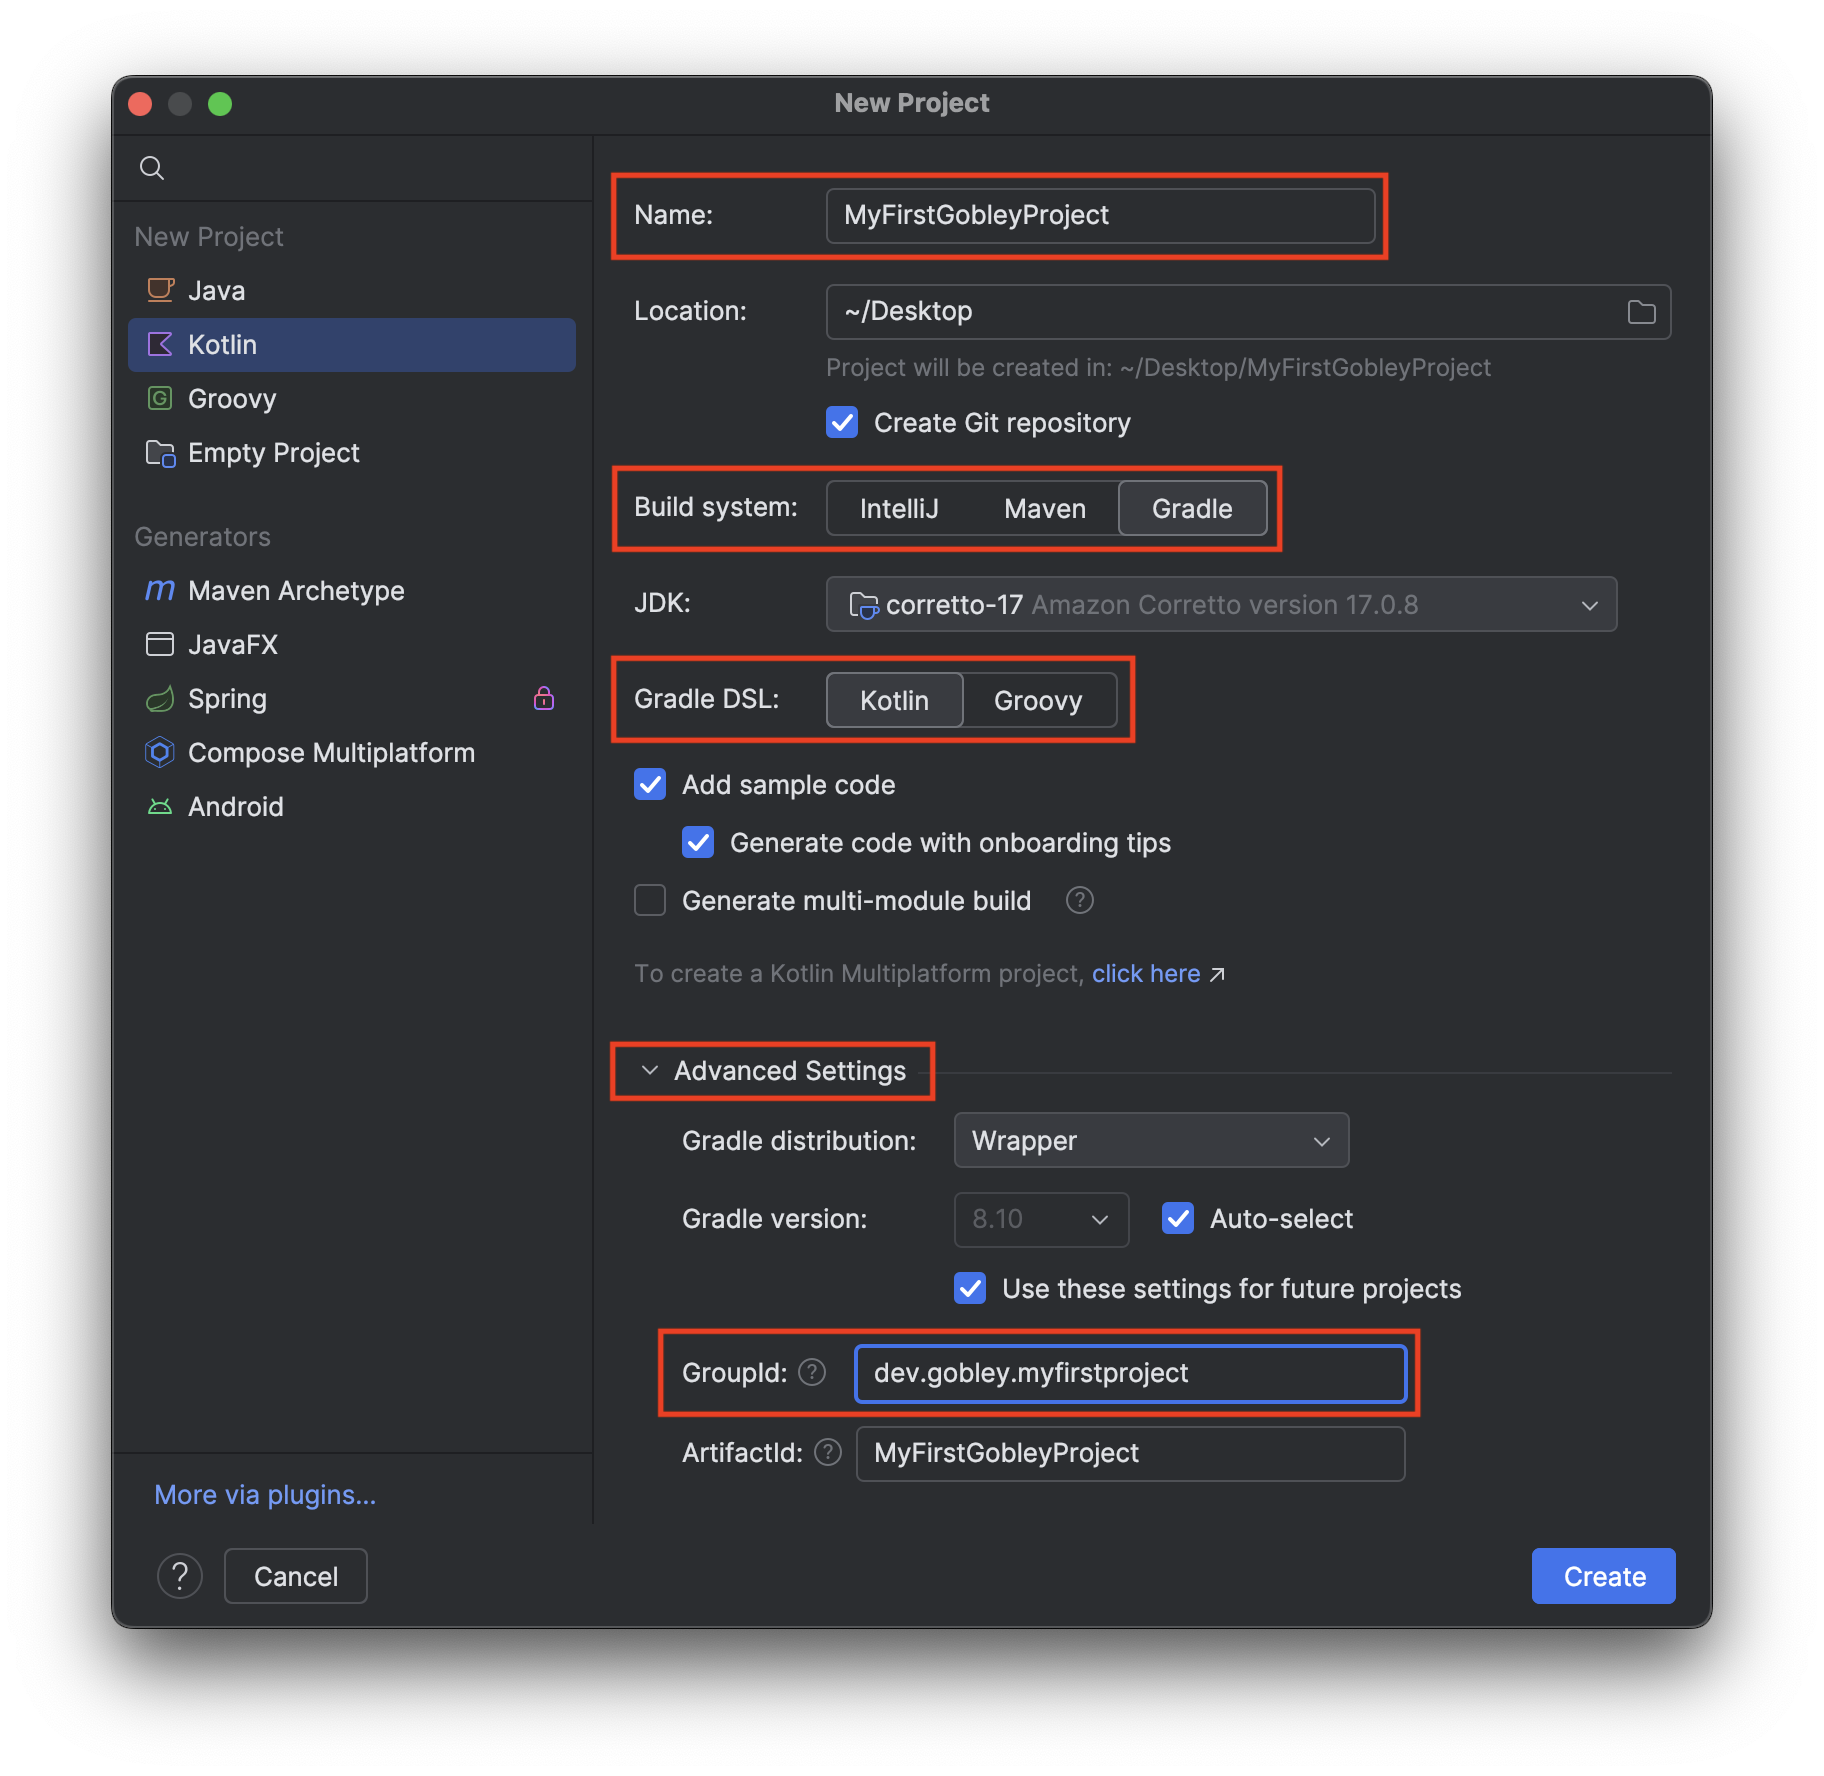
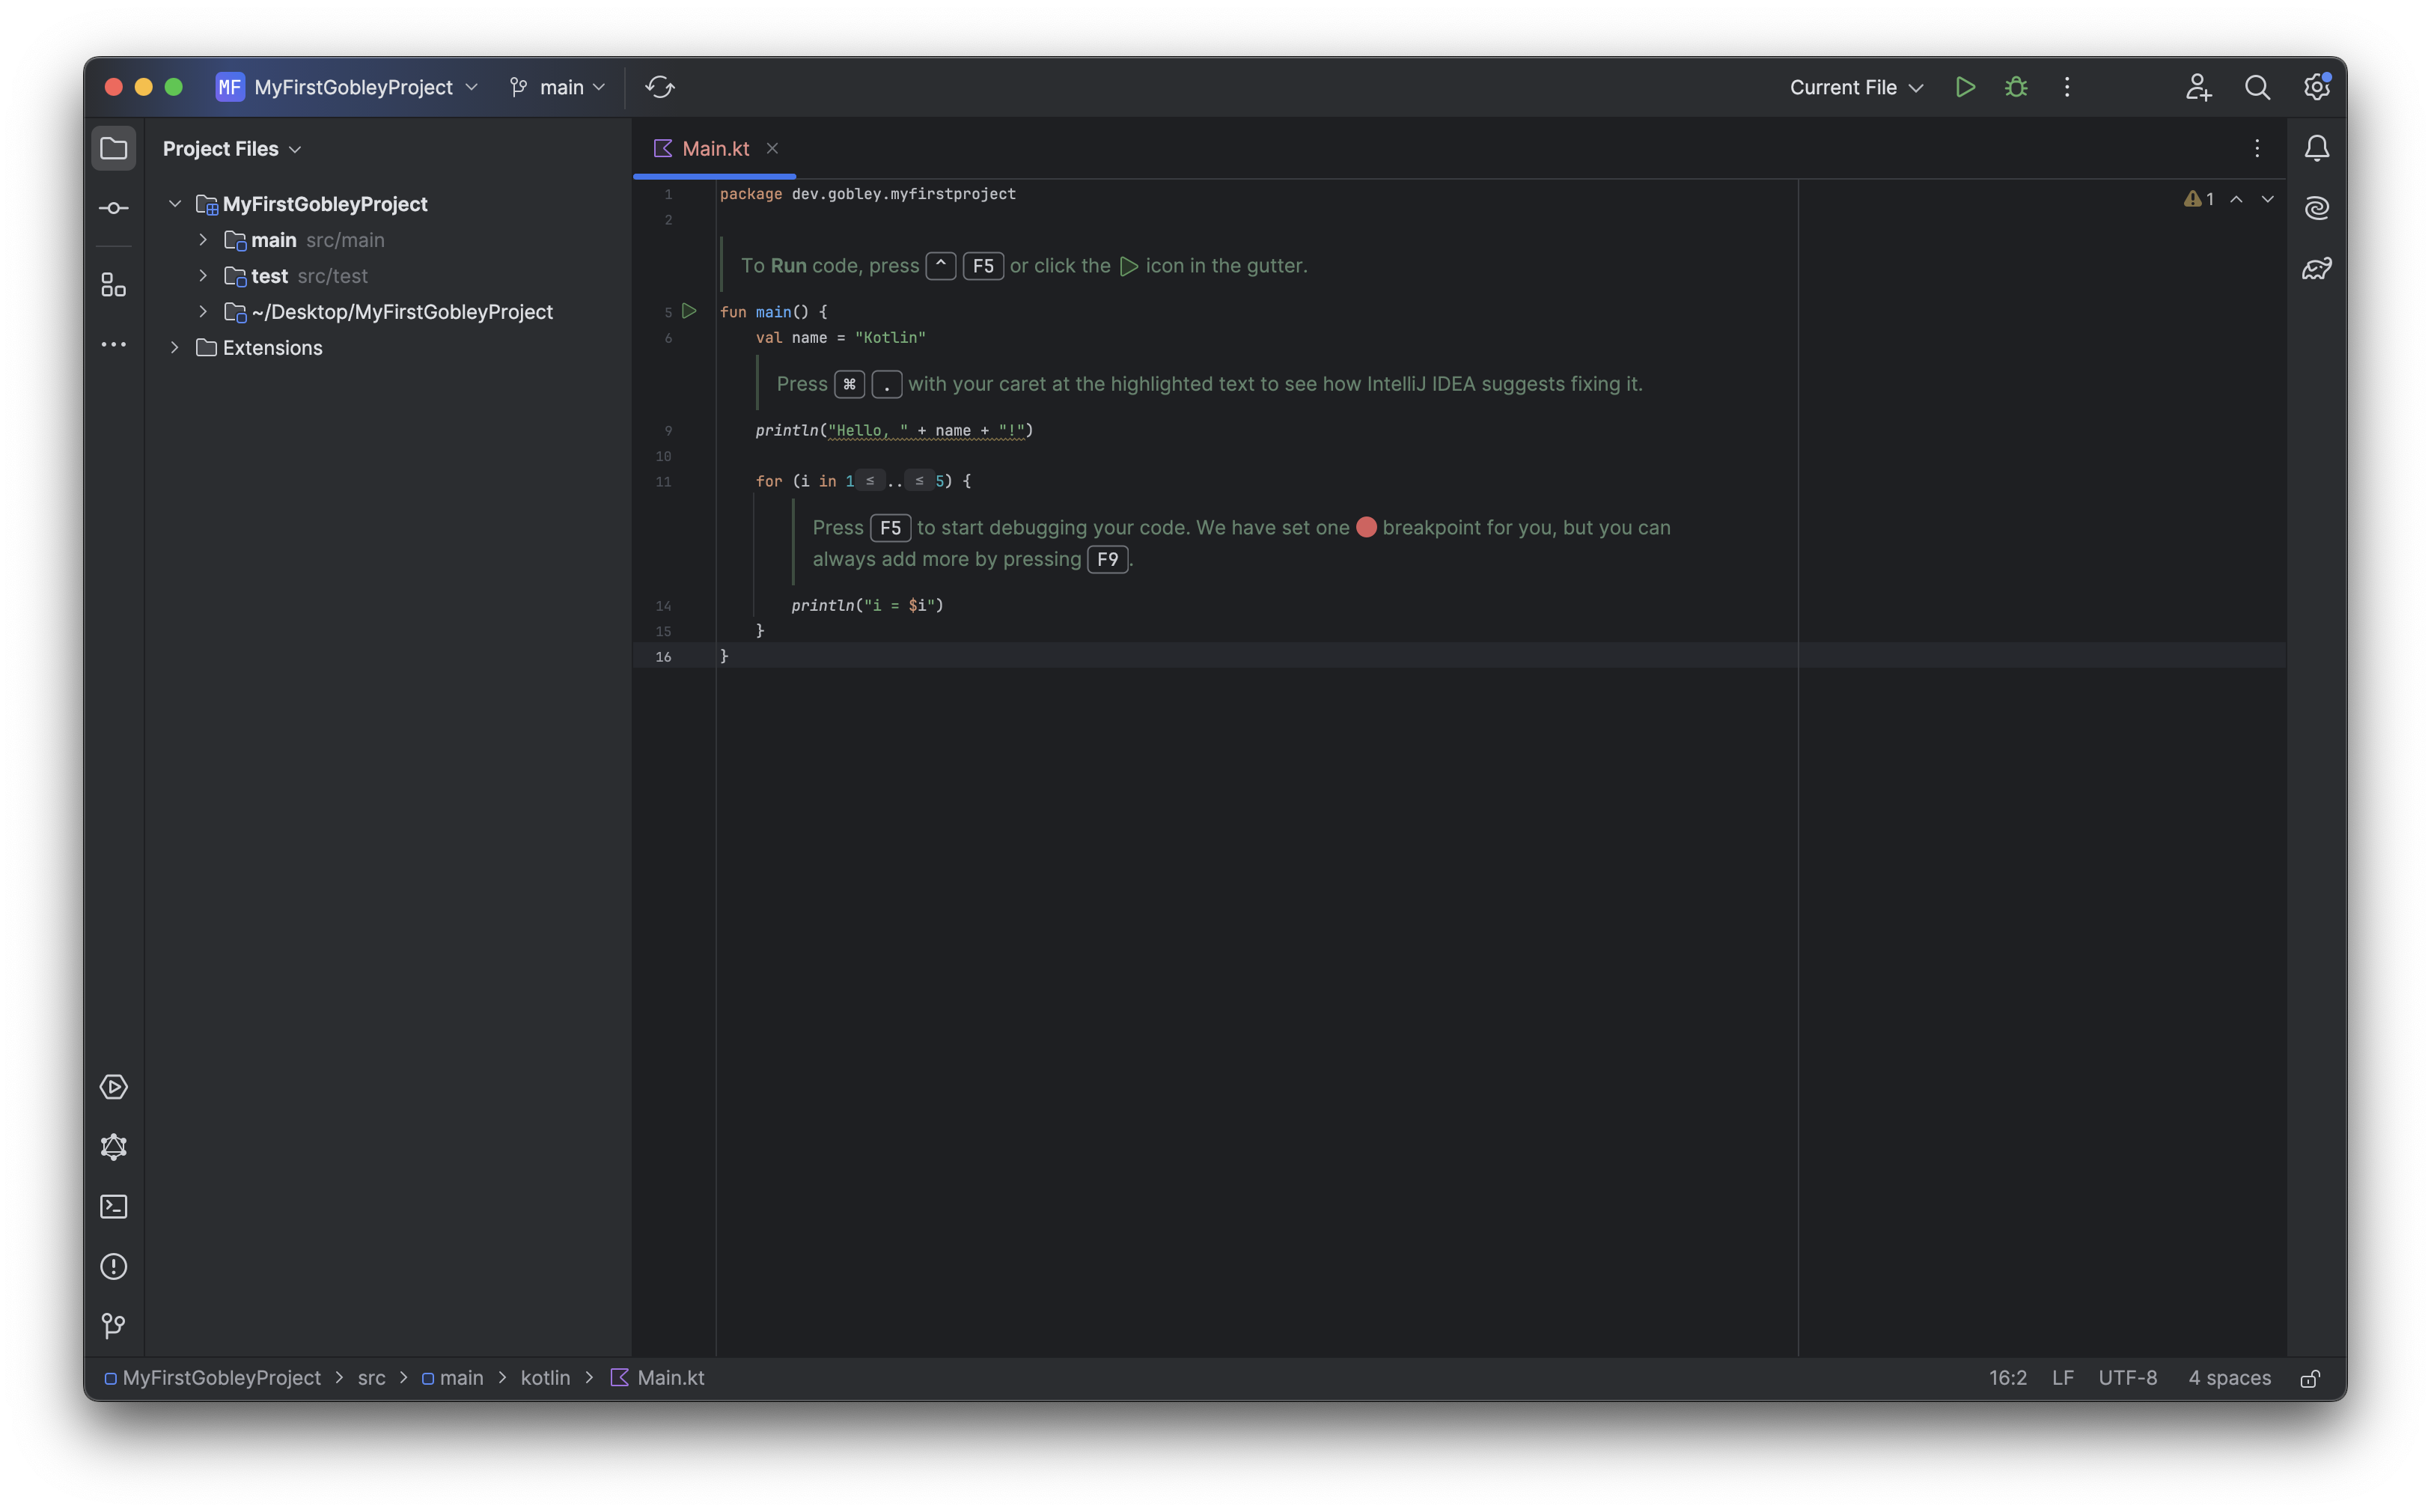
- Click the Create button, and the project will open.
Adding Rust to your Kotlin/JVM project
Let's add a Cargo package to the Kotlin/JVM project.
-
Make sure you installed
cargoandrustup. -
Open the Terminal menu in IntelliJ IDEA. Run:
cargo init --lib --name my-first-gobley-project --vcs none .Let's see what this command does:
cargo initwill create a new Cargo package in.(the current directory).--libmeans that Cargo will create a library crate.--name my-first-gobley-projectmeans that the name of the resulting Cargo package will bemy-first-gobley-project. Cargo doesn't like camelCase.--vcs nonemeans you don't want to generate.gitor.gitignore..is the directory where we'll code both in Rust and Kotlin.
After running this command, the following files should be generated:
Cargo.toml: This file contains the definition of the Cargo package.src/lib.rs: The Rust source code file.
-
Add
/targetto.gitignore.💡 This is the folder where Cargo stores the build intermediate files and the final Rust library.
-
(Optional) Move
src/lib.rstosrc/main/rust/lib.rs.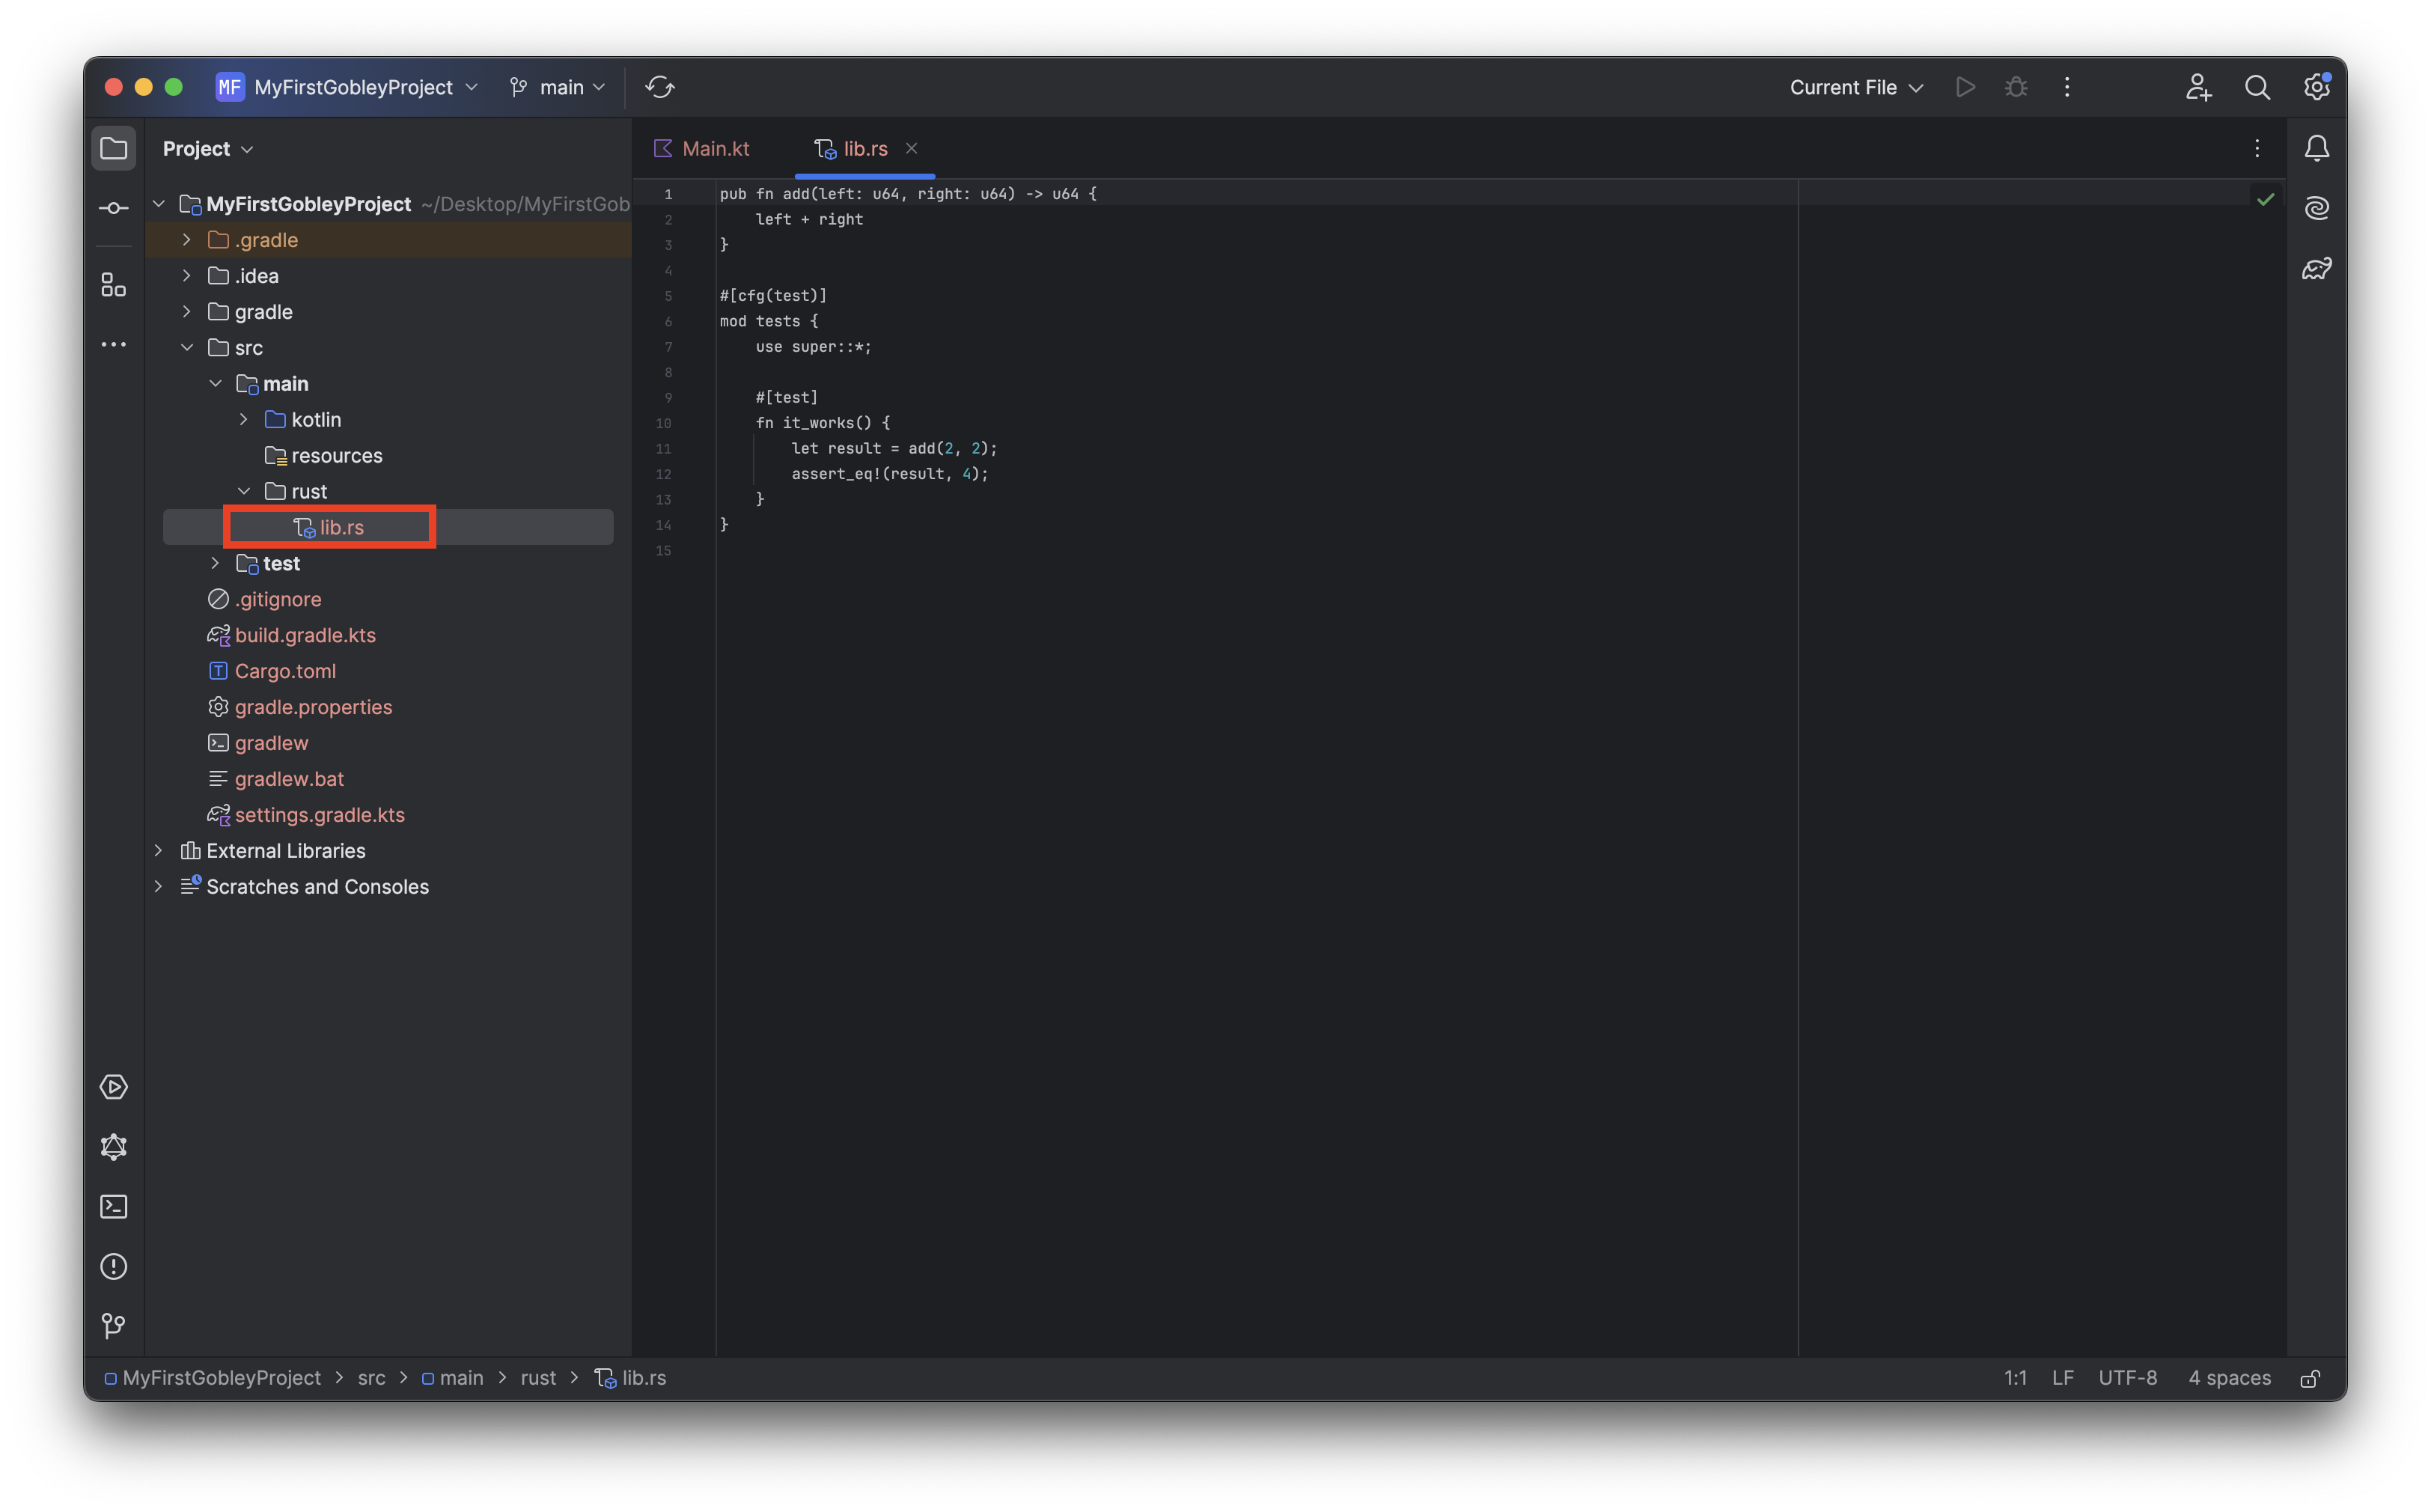
💡 When you use CMake in an Android project, C++ source files are usually located in
src/main/cpp. This procedure imitates that behavior. It feels more organized, isn't it? -
Modify
Cargo.tomllike the following.# This part is already added by cargo init.
[package]
name = "my-first-gobley-project"
version = "0.1.0"
edition = "2024"
[dependencies]
# We need to add this.
uniffi = "0.29.4"
# This as well.
[lib]
crate-type = ["cdylib"]
# Put this only if you moved lib.rs.
path = "src/main/rust/lib.rs"Let's see what each part of the modification does:
uniffi = "0.29.4"downloads UniFFI, the library used to generate the Kotlin code (the " bindings") that calls the Rust library.crate-type = ["cdylib"]will make Cargo generate a.dll(Windows),.dylib(macOS), or.so(Linux) file that can be used by Gobley.path = "src/main/rust/lib.rs"designates the path to the Rust source code.
-
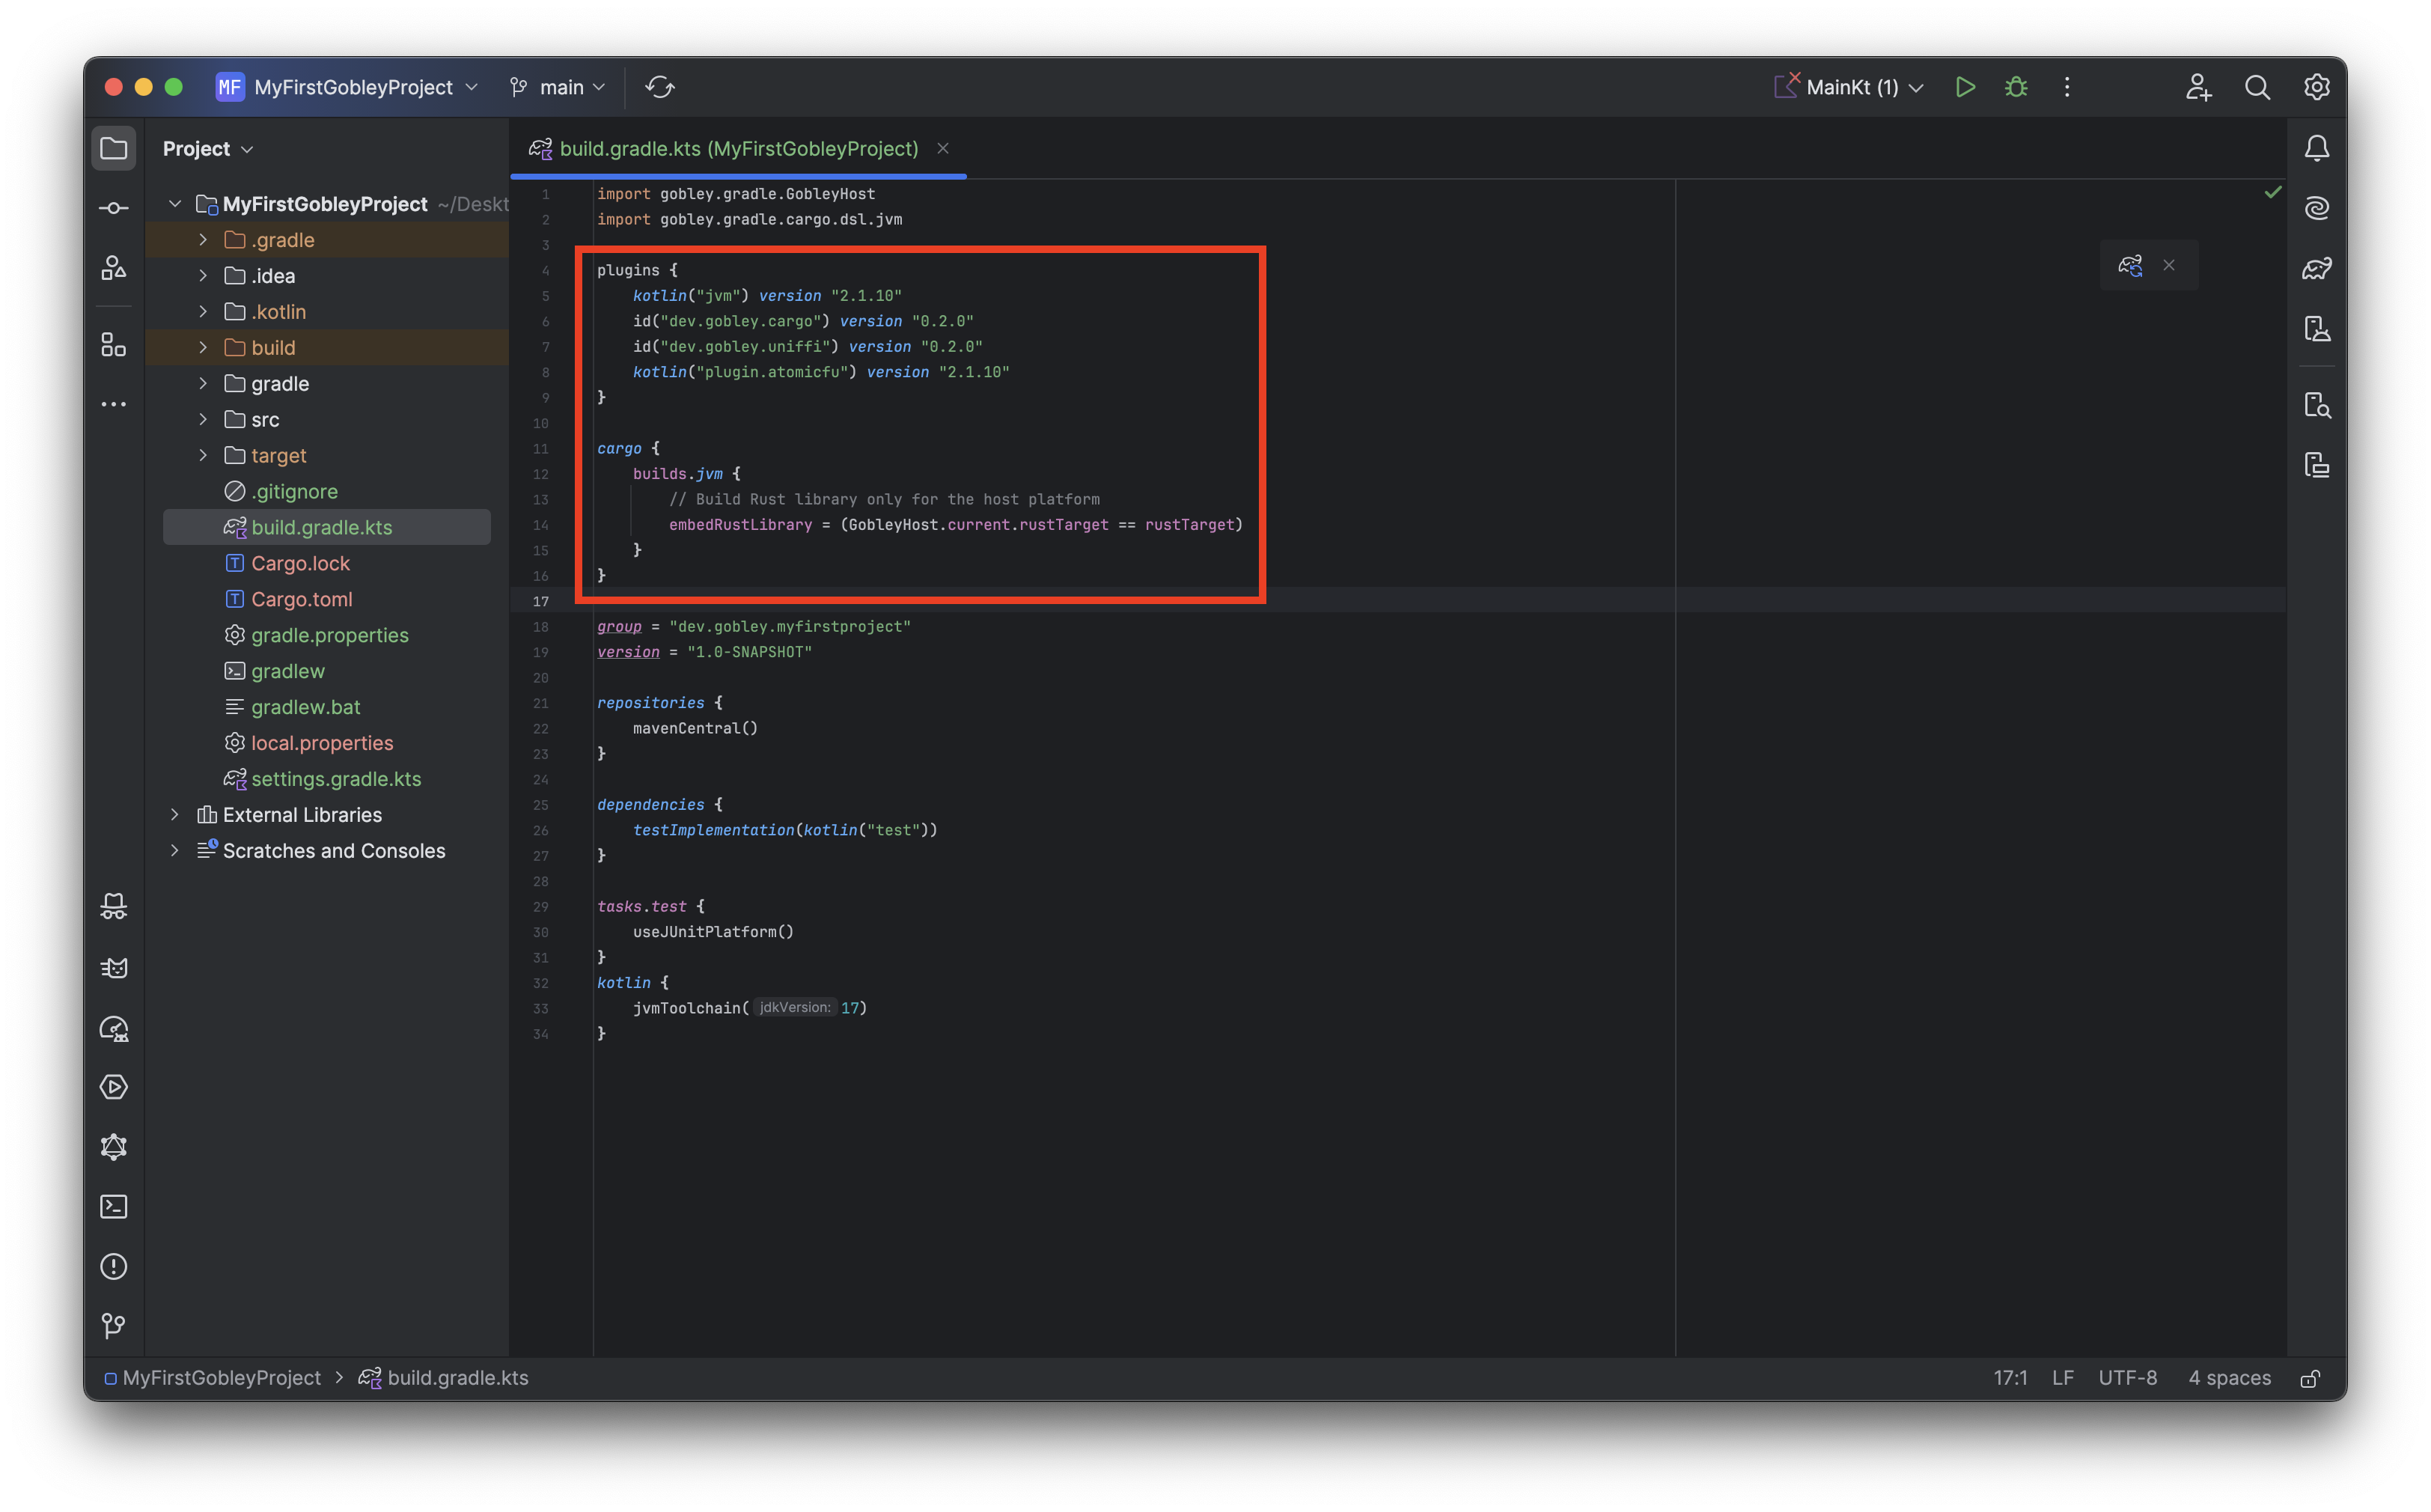
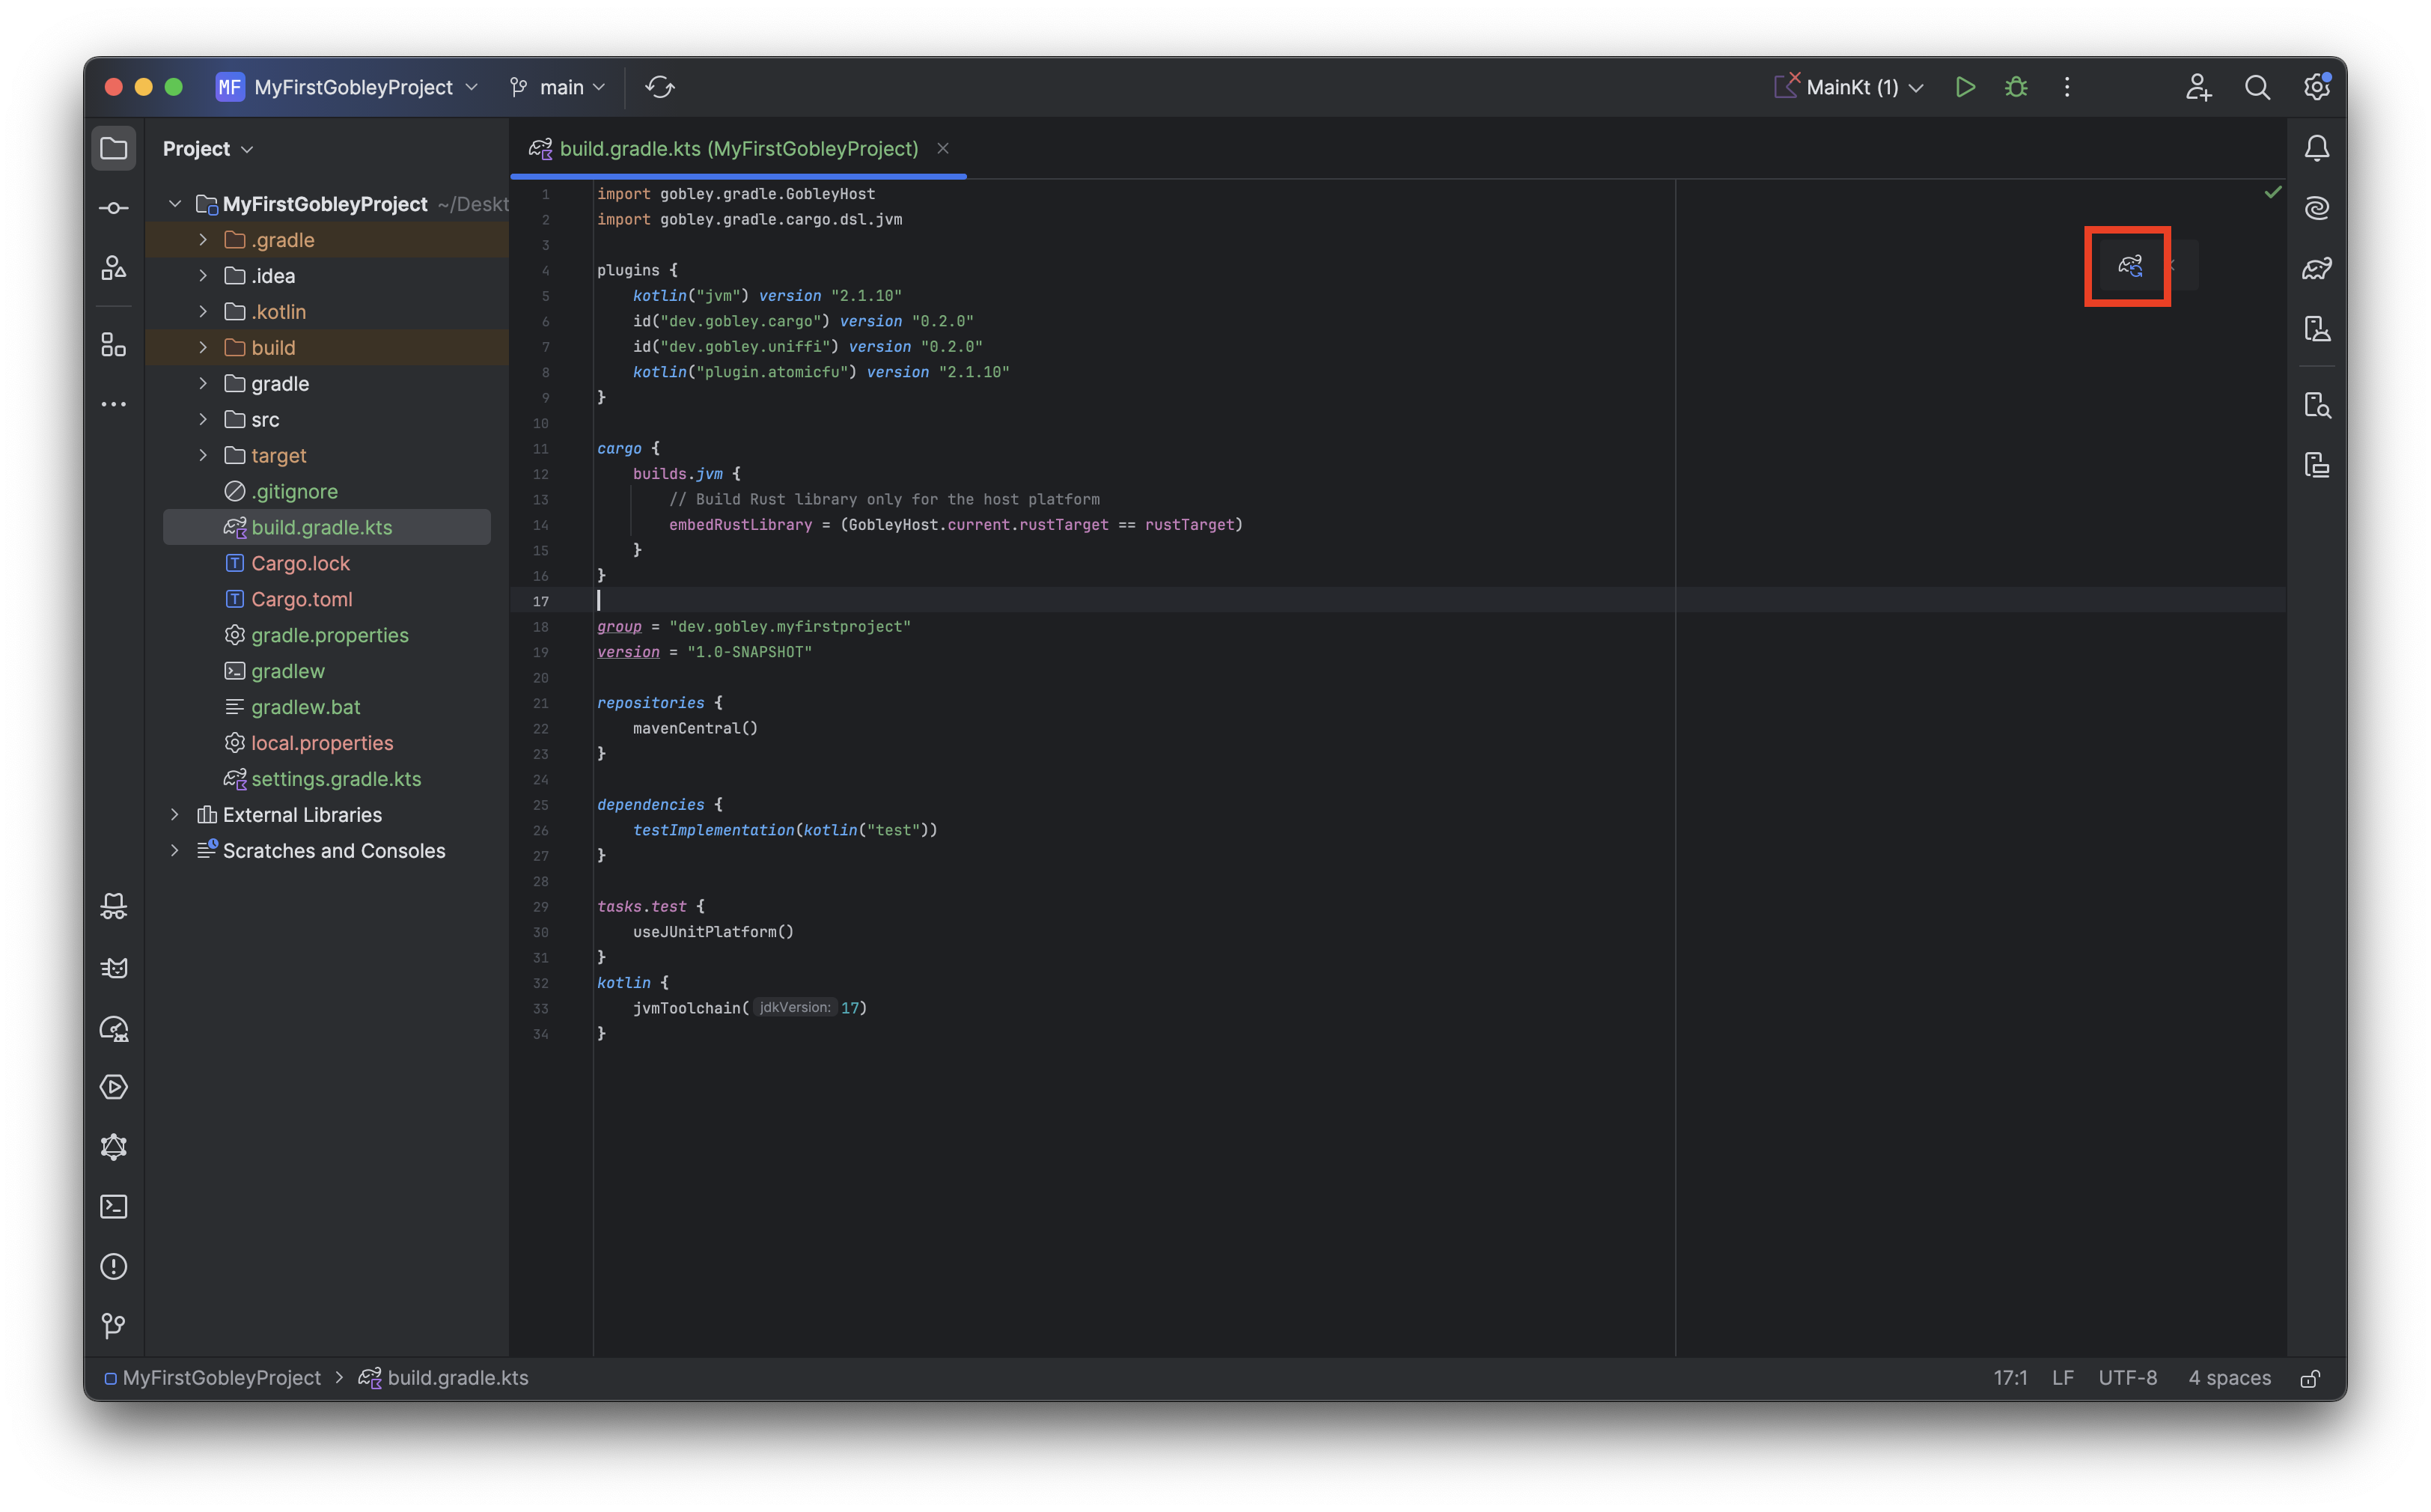
Modify
build.gradle.ktslike the following.import gobley.gradle.GobleyHost
import gobley.gradle.cargo.dsl.jvm
plugins {
kotlin("jvm") version "<kotlin version>"
id("dev.gobley.cargo") version "0.3.7"
id("dev.gobley.uniffi") version "0.3.7"
kotlin("plugin.atomicfu") version "<kotlin version>"
}
cargo {
builds.jvm {
// Build Rust library only for the host platform
embedRustLibrary = (GobleyHost.current.rustTarget == rustTarget)
}
}❗ Consider managing plugin dependencies using version catalogs.
💡 All Gradle plugins in Gobley are published in
mavenCentral().Let's see what each plugin does:
dev.gobley.cargobuilds and links the Rust library to the Kotlin application. Thecargo {}block controls Rust build options. In the above code, we instructed Cargo to build the library only for the host platform.dev.gobley.uniffigenerates the bindings using UniFFI. You can change the package name of the bindings inside theuniffi {}block.org.jetbrains.kotlin.plugin.atomicfuis to use atomic types used by the bindings.
We're now ready to code both in Rust and Kotlin!
❓ If you hit the Sync Now button at this point, you'll get a
Crate my_first_gobley_project not found in [lib]my_first_gobley_project.{dll, dylib, so}error. That's because you haven't useduniffi::setup_scaffolding!();inside the Rust code. If you encountered such an error, go straight to the next step.
Defining and exposing Rust types and functions
Now is the time to code in Rust. Open the project folder in Visual Studio Code.
code .
# or on macOS
open -a "Visual Studio Code" .
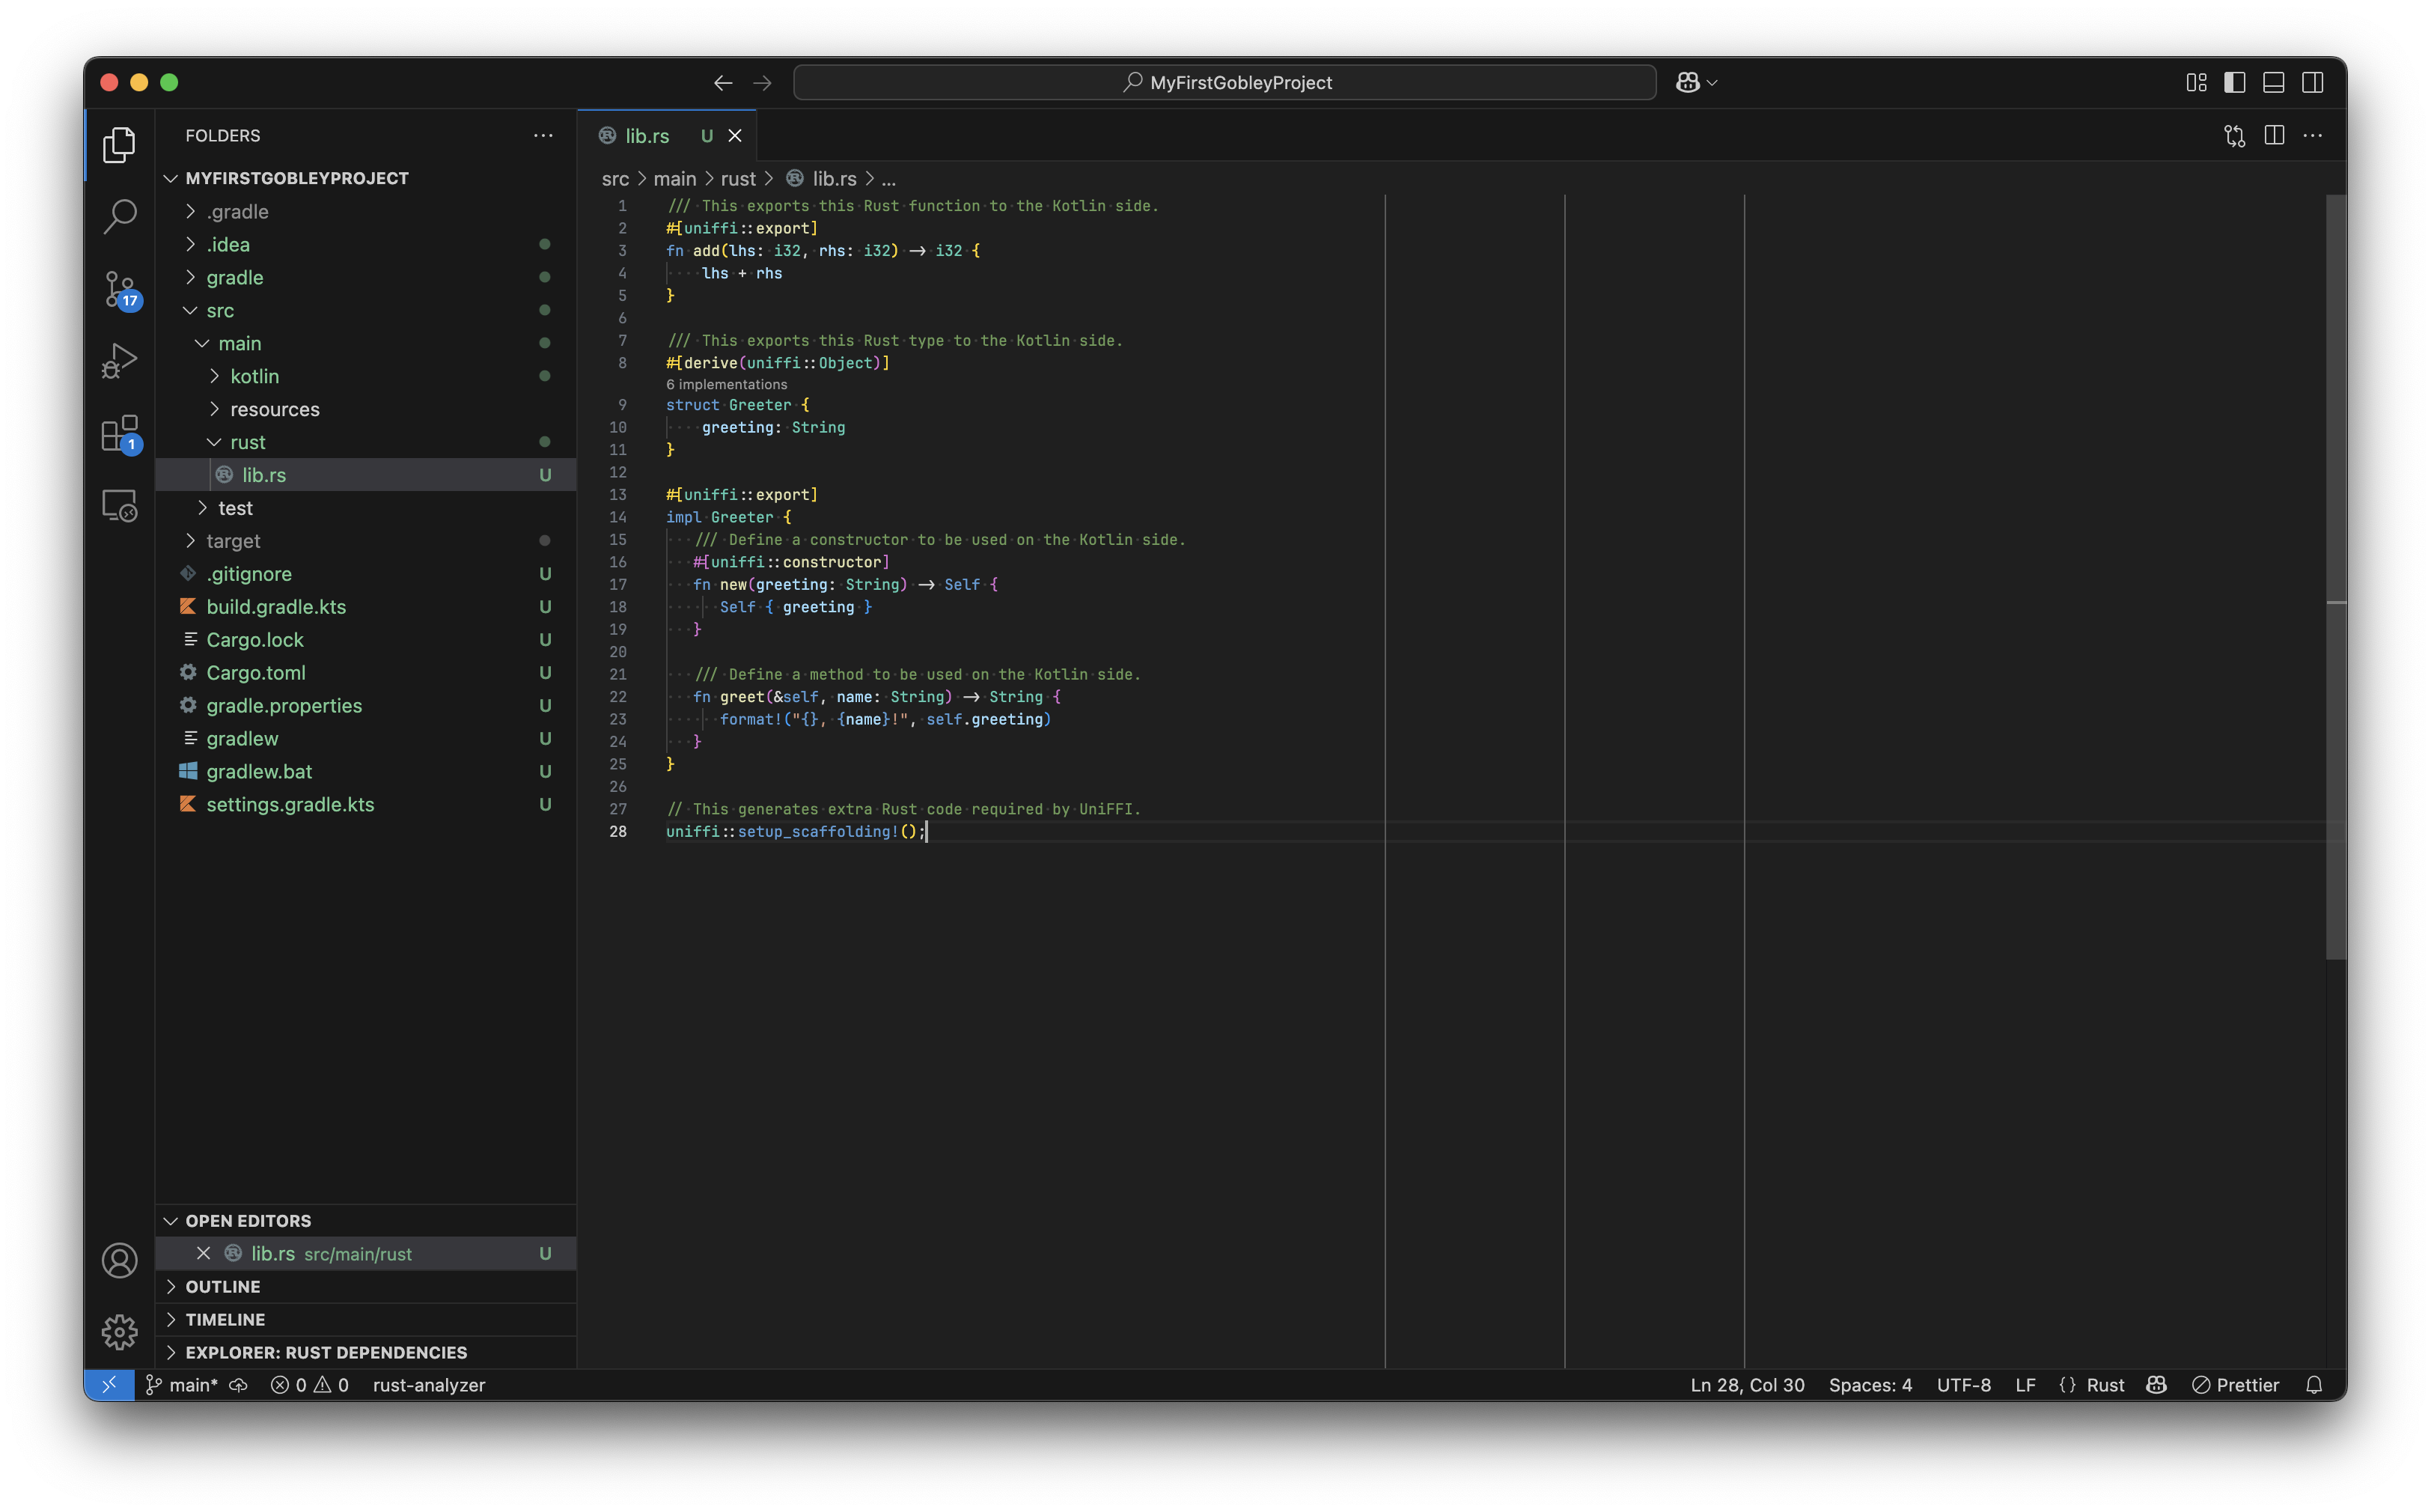
Once rust-analyzer is ready, you can see highlightings and inlay hints in the code editor. Modify
src/main/rust/lib.rs as follows.
/// This exports this Rust function to the Kotlin side.
#[uniffi::export]
fn add(lhs: i32, rhs: i32) -> i32 {
    lhs + rhs
}

/// This exports this Rust type to the Kotlin side.
#[derive(uniffi::Object)]
struct Greeter {
    greeting: String
}

#[uniffi::export]
impl Greeter {
   /// Define a constructor to be used on the Kotlin side.
   #[uniffi::constructor]
   fn new(greeting: String) -> Self {
      Self { greeting }
   }

   /// Define a method to be used on the Kotlin side.
   fn greet(&self, name: String) -> String {
      format!("{}, {name}!", self.greeting)
   }
}

// This generates extra Rust code required by UniFFI.
uniffi::setup_scaffolding!();
By just applying #[uniffi::export] or similar macros, the functions and the types become available
on the Kotlin side. Go back to IntelliJ IDEA and press the Sync Gradle Changes button.
Cargo will start building the Rust library inside IntelliJ IDEA. After the build completes, modify
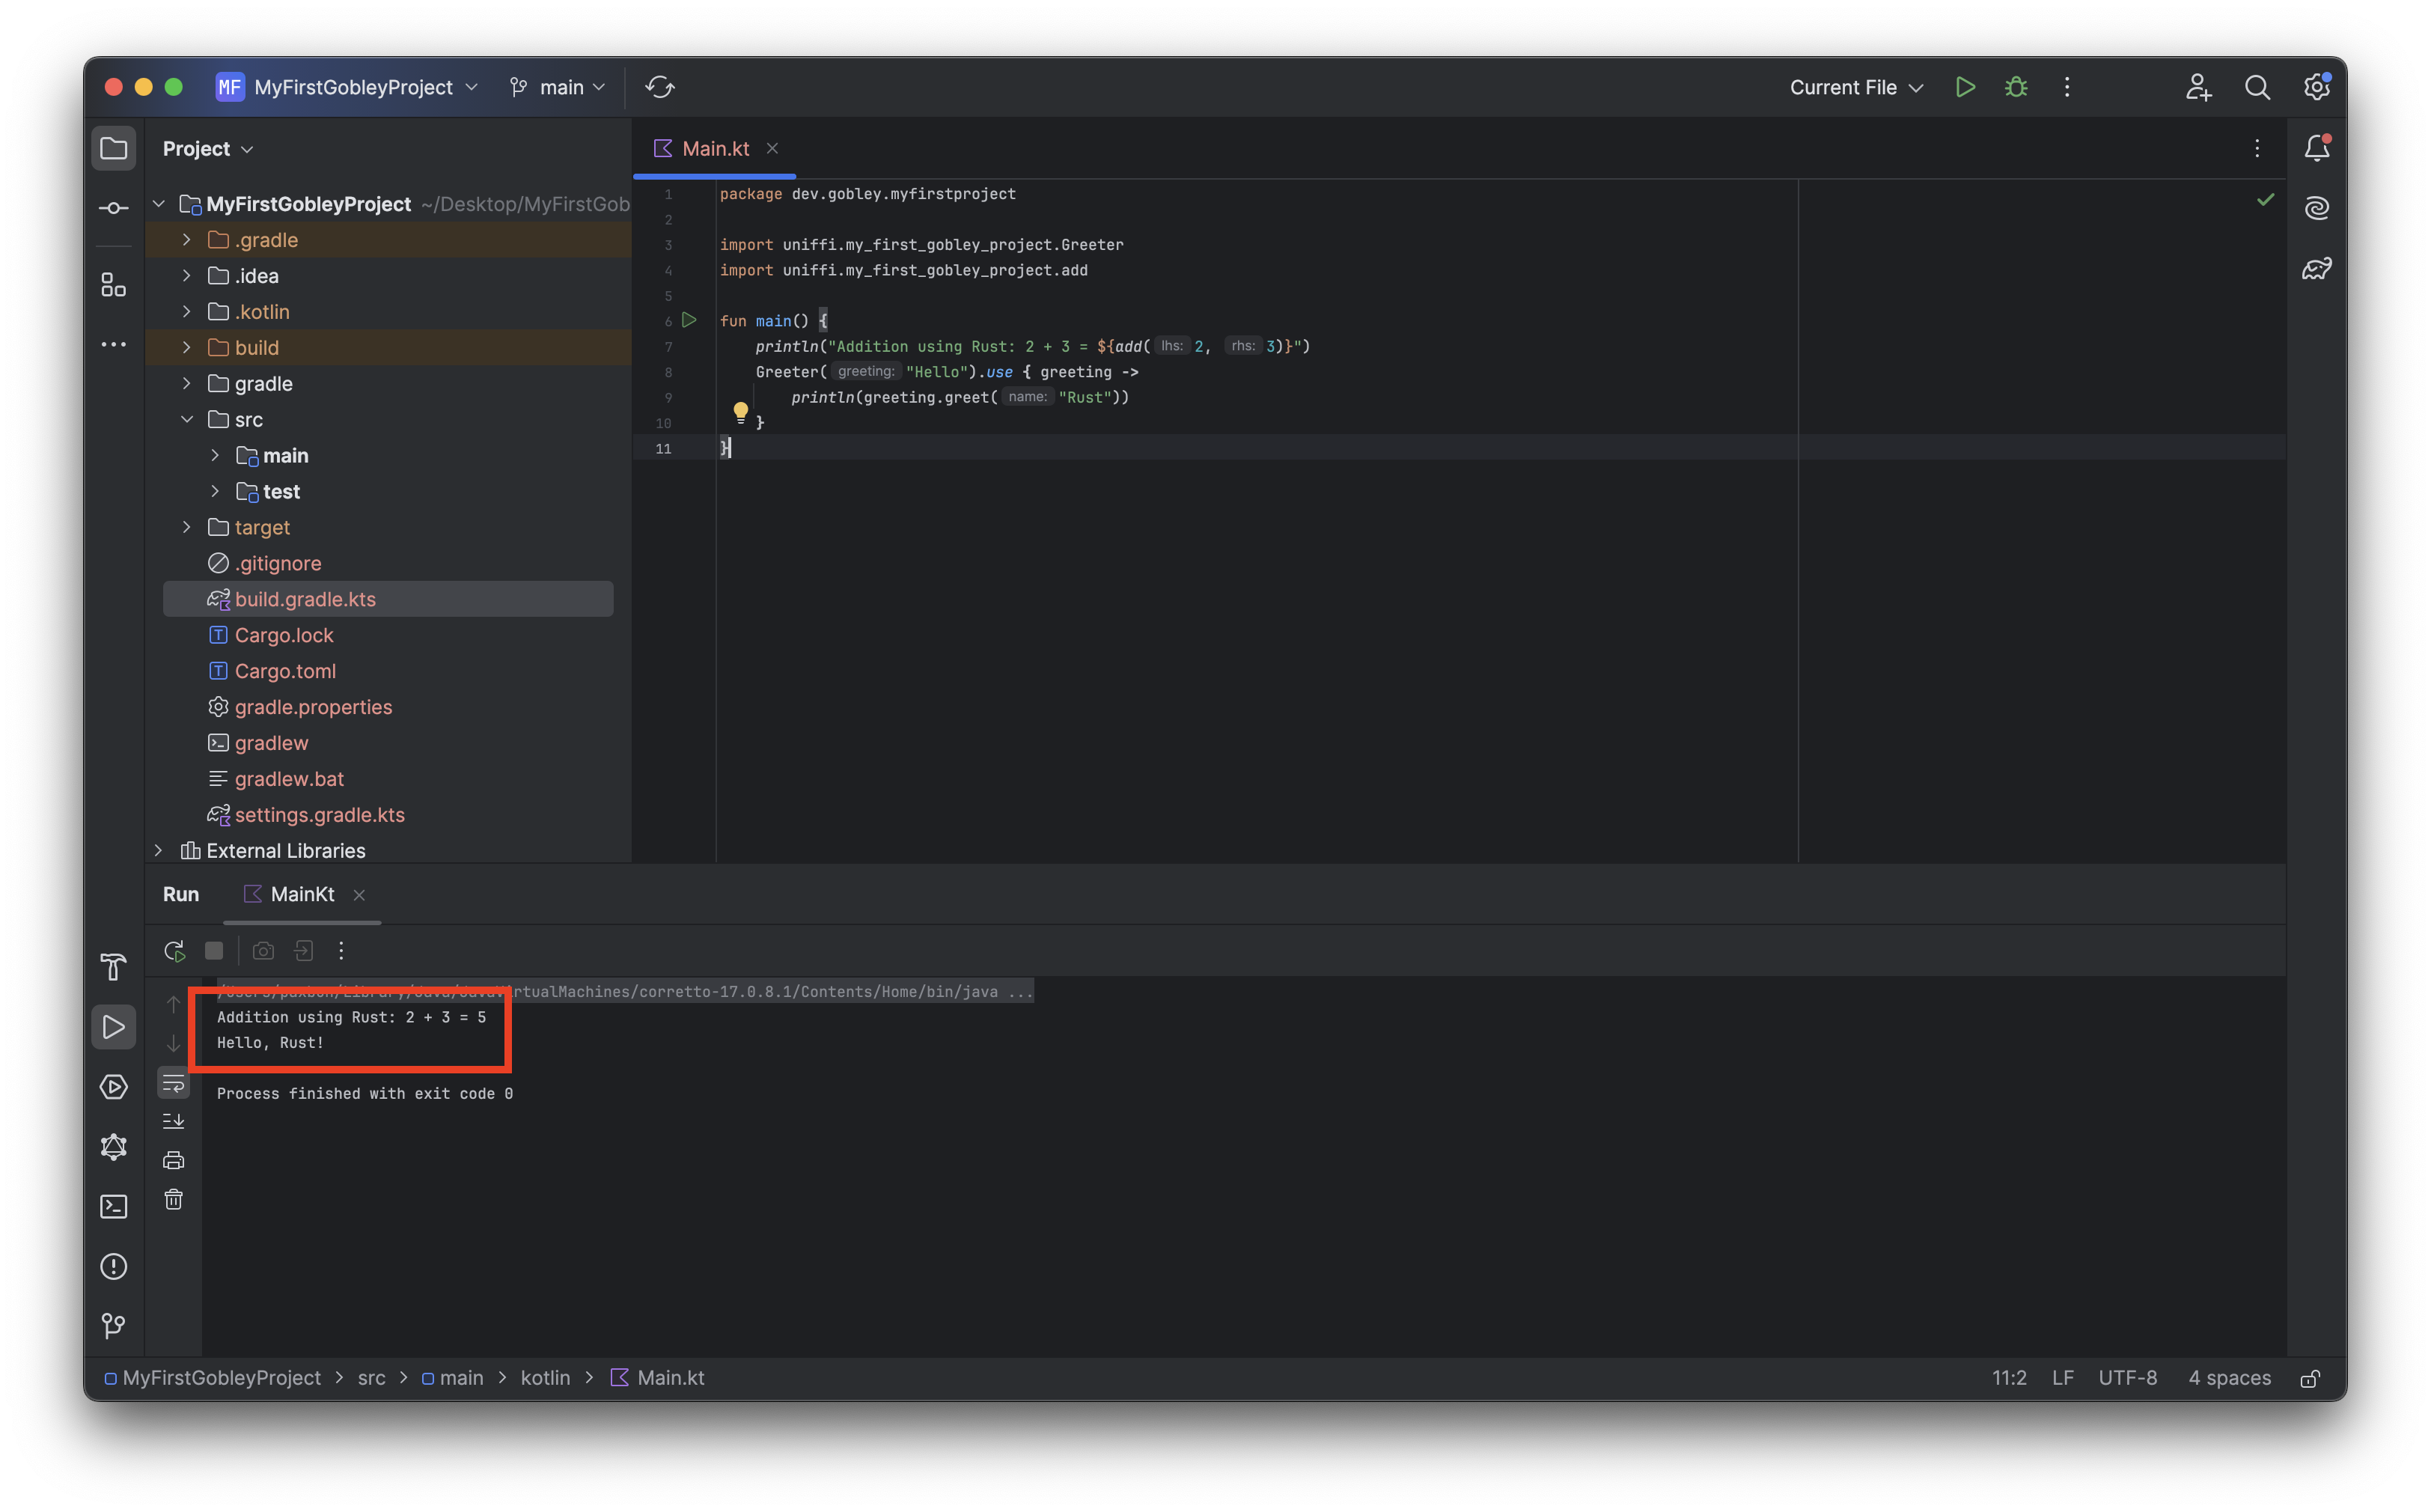
src/main/kotlin/Main.kt as follows.
package dev.gobley.myfirstproject

import uniffi.my_first_gobley_project.Greeter
import uniffi.my_first_gobley_project.add

fun main() {
    println("Addition using Rust: 2 + 3 = ${add(2, 3)}")
    Greeter("Hello").use { greeting ->
        println(greeting.greet("Rust"))
    }
}
Greeter and add exported on the Rust side are accessible on the Kotlin side! Doc-comments are
also available, so you don't have to write the same description twice.
Let's run the program. Hit the Run button on the upper right corner of the screen. You can see the program communicates with Rust without any issues.
Next step
And that's how you embed Rust into your Kotlin project. If you need more detailed information about Gobley, please read the documentation.